This post may contain affiliate links. Please read the disclosure policy.
Driving back to the Bay Area from Phoenix is fun for about the first hour or two. What you have next is about eight to ten hours of torture. If we stick to our normal travel schedule, we usually get home early in the morning. Just in time for my favorite part of the drive, a silog breakfast. It doesn’t matter what the ulam is, I love the tasty Filipino Garlic Rice, or sinangag. The perfect bite has rice, meat and egg in one.
I have tried many different recipes in efforts to duplicate the garlic rice at home. Each one had their positives, but I was still looking for that over the top flavor. Not to mention, we eat brown rice so that adds another challenge.
How to Make Tasty Filipino Garlic Rice

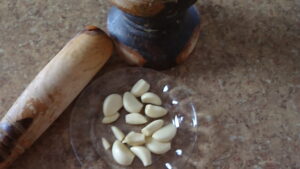
I am sure that you can make this with yesterday’s rice but my recommendation is to go with a fresh pot. I take advantage of that fresh pot and get the garlic flavor going right away. Wash and cook 4 cups of rice like normal. Before cooking add 2 tablespoons of coconut oil and three cloves of smashed garlic. I have mentioned in other recipes that I love using my wooden mortar and pestle to prepare my garlic. I love how the smashing of garlic releases its oil. You can go with mincing your garlic, but this is perfect for this recipe.
I use coconut oil in this recipe for all of its possible health benefits. I also like that coconut oil can withstand high temp cooking, due to its high fat content. This is exactly what you are going to want when you fry up the garlic. Between coconut and avocado oil, you cannot go wrong when cooking with health in mind. The early addition of oil at this point will give your rice a coat of oil before it goes to the pan. Not only will it be easier to fry but you’ll also be happier when you wash the pan.
The Garlic
For tasty Filipino garlic rice, they key word is “tasty”. When cooking up your garlic, it is so easy to burn it. The goal here is to get a perfect crisp to your garlic but at the same time, infuse its flavor into the oil. So the trick that I use here is to take your time. Warm up your pan at a medium heat. Coat your pan with 4 tablespoons of coconut oil. When the oil is ready, scoop out your garlic and as much oil from the mortar. You want enough heat to generate a sizzle and you should not see your garlic getting cooked to a crisp. Right now you are extracting as much of the garlic flavor into the oil as possible. So take your time cooking the garlic. As equally important, don’t burn your garlic. When burned, garlic will have more of a bitter taste.
This step is optional, but I recommend this it if this is the first time you are making this dish. When it becomes crispy (light tan or slightly golden color) scoop up the garlic, dripping out as much oil as possible. I like putting it on a bigger spatula and then sit the spatula at an angle to let the oil flow down. Place the garlic on a saucer or in a bowl and set aside. This will prevent your garlic from burning when you add your rice. Mixing rice well when frying can be difficult if you are not used to it. If not mixed well your garlic and/or rice can easily get burned onto your pan.
Rice, Rice Baby
Now that your oil is garlic infused, it’s time to add the rice to your pan. I find that the best way to ensure that you get some garlic oil in your mouth is to go with the movie theater popcorn method. Put enough rice in the pan to get fully coated with the oil. This portion will represent the popcorn that gets the butter drizzled on it. Add half of the rest of the rice and mix it well. If you removed your garlic, add it back to the pan now. Be sure to save some to sprinkle over your rice, before eating. Now add the remainder of the rice and mix it well. At this point, every bite should have some of the fully coated rice. And there you go.
For this dish I am pretty positive that you pressed the cook button on your rice cooker.
Enjoy and feel free to send us pictures of your tasty Filipino Garlic Rice!
Masayang Pagluluto!
Kain na tayo!
Sinangag Tasty Filipino Garlic Fried Rice
Ingredients
- 4 cups rice washed
- 4 Tbsp coconut oil
- 1 head garlic minced for pan fry
- 3 cloves garlic minced to cook with rice
Instructions
Rice cooker
- Add 3 cloves of minced garlic to washed rice into the rice cooker. Cook rice as usual.
Fry Garlic
- Set pan on medium heat and coat with coconut oil.
- Add garlic (1 head minced). Pay close attention, don't burn or it will be very bitter.
- Once garlic is crispy and golden, scoop out the garlic draining as much oil as possible and set aside. Leave as much garlic infused oil in the pan.
Fry Rice
- Add rice to the pan half at a time so you are able to mix the rice and oil well.
- Add some of the crispy garlic to the pan, be sure to set some aside to garnish the top.
- Plate the rice and sprinkle with remaining crispy garlic pieces.