This post may contain affiliate links. Please read the disclosure policy.
Gogi! Gogi!
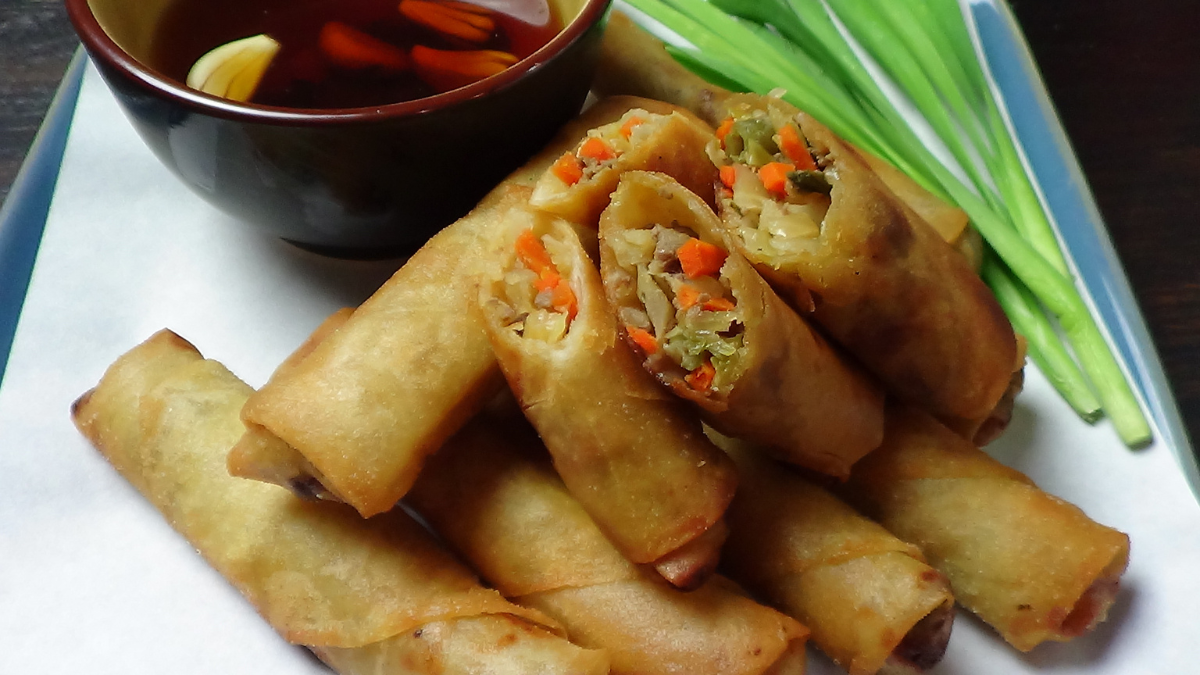
There was a time when lumpia was the prized appetizer, snack, meal, breakfast, lunch, dinner or breath mint for Filipino parties and celebrations. Today, the deep fried, crispy treat is loved by many. It is amazing to hear people from other ethnic cultures rave about lumpia. Admittingly, lumpia is 100% better eating, than making. A labor of love, or a family bonding moment, is definitely required to make lumpia. Being a Korpino family, we enjoy lumpia fused with the delicious flavors of Korean cooking. This is how we came up with a Delicious Lumpiang Korpino Recipe.
Lumpiang Korpino
So what makes our lumpia recipe Korpino? In lumpia, along with the veggies, ground pork and chicken can be savored with each bite. For Lumpiang Korpino, we switched out the traditional meats and replaced it with the delicious Korean “fire meat”, bulgogi. The aromatic and scrumptious, thinly sliced meat is an awesome change up. Not to mention, making the bulgogi for Lumpiang Korpino is pretty easy. Really, the challenges are the veggie prepping and wrapping. On a positive note, those challenges can be seen as time challenges versus cooking challenges. Believe me, after one Lumpiang Korpino, you will be chanting, “Gogi, Gogi!”. As you probably have guessed, the bulgogi is the star of the show for the Delicious Lumpiang Korpino Recipe.
Lumpia Roots
Like many awesome Filipino dishes, the lumpia was inspired by the foods of the Chinese immigrants and traders. The Fujian spring roll, popiah, was introduced to the Filipinos as early as the 17th Century. Popiah is a fresh spring roll, serving as the model for the Filipino fresh lumpia. On the “flip” side, the worldwide popular lumpia is deep fired, like other similar spring or egg rolls that are more commonly served on a commercial basis.
Egg Versus Spring
Although similar looking, spring rolls and egg rolls are different. More than likely due to the commercial popularity of these delicious treats, both names have been used synonymously. At first sight and taste, the biggest difference is the texture of the two. Spring rolls are lighter, thinner and and are more on the smooth side versus the egg rolls. This is because of the fact that spring roll wrappers are made out of rice or flour. Conversely, egg roll wrappers are made of wheat flour and eggs, giving it a thicker and bubble texture. I actually like switching up to egg roll wrappers, every now and then, when making turon, banana lumpia. The biggest example of the difference between the two is that spring rolls can be served fresh, or uncooked (ie fresh lumpia and Vietnamese fresh spring roll).
Delicious Lumpiang Korpino Recipe Ingredients
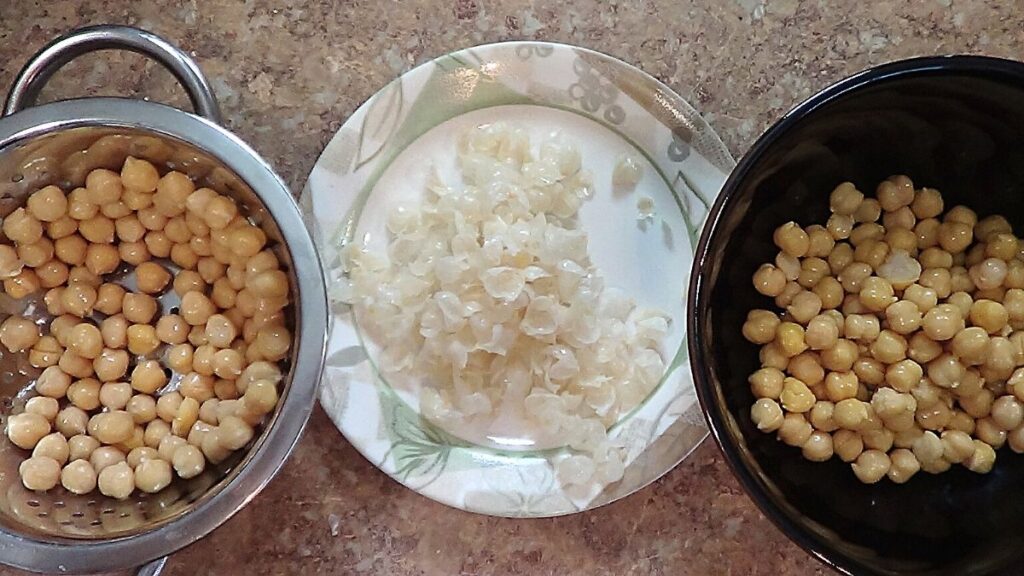
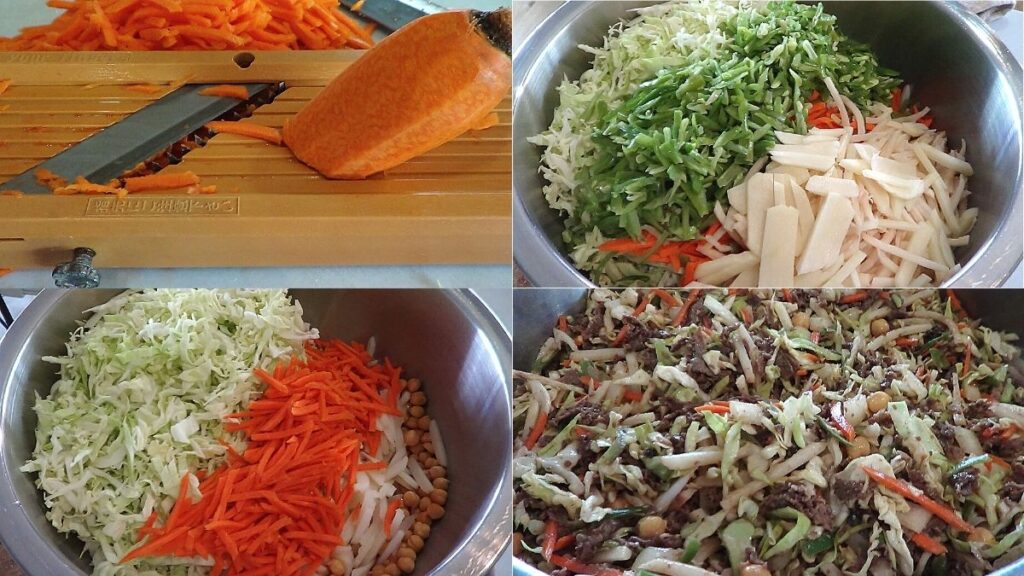
I have found that it is hard to use the term “traditionally” when referring to some Filipino dishes. The archipelago country consists of so many culturally different culinary methodologies. So “traditionally”, in my family, lumpia consisted of cabbage, carrots, onions, green beans, garbanzo beans, water chestnuts, potato, and the meat. The meats typically were ground pork, shredded chicken or even better, both. Every now and then, I remember ground beef as well.
Think Safety
Preparing the veggies can be very time consuming. The easiest ingredient will be the frozen French Cut Green Beans. It will only need defrosting. The garbanzo beans will need deshelling or peeling. The cabbage will need shredding. Water chestnuts need to be cut. Potatoes and carrots peeled and cut. Using a Mandoline Slice saves so much time but it can be dangerous. To Be safe, don’t try to cut all the way down the vegetable when using the Mandoline. A good rule of thumb (first and foremost, try to keep your thumbs and fingers intact) is to cut through two veggies versus one. For example, if you need one full carrot cut, cut to the half point of two carrots instead of one.
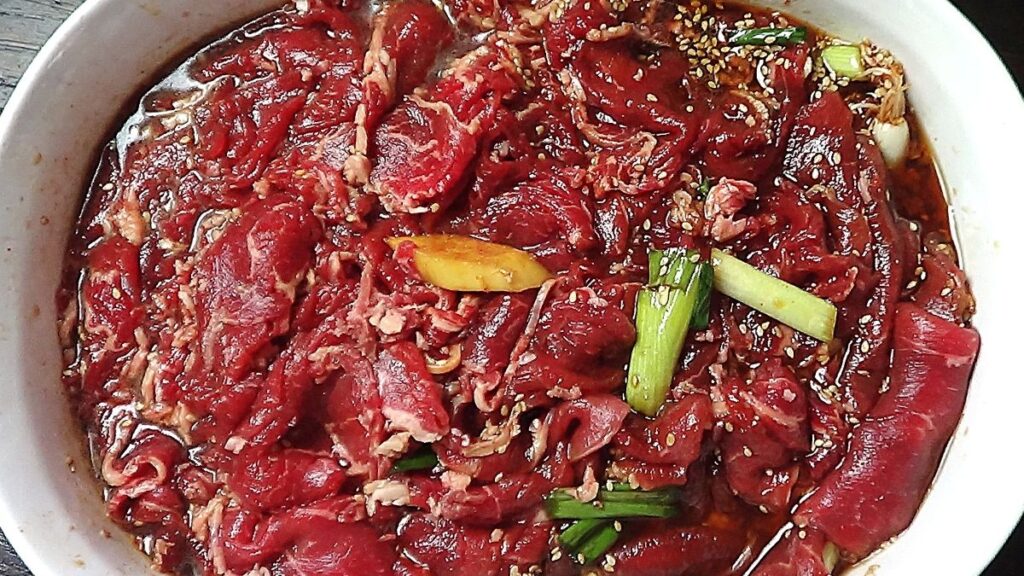
What makes this a korpino dish is the substitution of bulgogi, as the meat. For lumpia, it is not necessary to spend a little more on the sliced rib eye. Because it is being mixed well with all of the veggies, thinly sliced, beef eye round works perfectly. This can usually be bought at Asian markets. Many times you can find it in the frozen meat section.
As a final side note, I know that this might upset some of my Filipino brothers and sisters, but I say “no” to the raisins as part of the lumpia filling.
To Cook or Not to Cook
As you can see, the filling gives you some wiggle room to get creative. Through my many trials of getting this recipe right, I considered ways to make lumpia a little more healthier. Many would think that “Healthy Filipino Food” is an oxymoron, especially when it comes to something that is deep fried.
When preparing the filling, you typically want to give it a quick cooking but not too much. If cooked too much then you will run a higher risk of your lumpia absorbing too much oil when cooking. On my last trial, other than the bulgogi, I decided not to cook the filling at all.
By not cooking it, my only worry was the possible added area of difficulty when wrapping. If not cooked, some of the veggies might protrude right through the wrappers. To mitigate this potential, I gave the filling (with the meat) a good mix and allowed it to sit in the refrigerator over night. This softened up the veggies enough for easy wrapping.
The final test was the oil retention, or hopefully the lack there of, after cooking. Sure enough, the oil was not too heavy with each bite and the texture and flavor of the veggies were actually better too.
From here on out “Not to Cook” is definitely the way to go.
Wrapping Tips
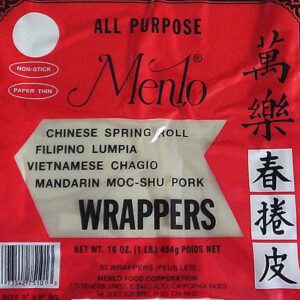
Through all of my experience with wrapping lumpia, I have found that success begins with the wrappers that you purchased. From observing as a kid to rolling myself, I only have experience with the Menlo wrappers. There might be other brands out there that are just as good, or maybe even better, but I tend to be a creature of habit when it comes to making safe choices. I must add though, that even when buying Menlo wrappers, be sure to choose packages that are free from snags or rips. Any air that may have gotten into the package, when the wrappers were not frozen, some or all of the wrappers may have gotten dried out. When grabbing your wrappers, select the ones that have the wrappers tightly frozen together. Bypass the ones that have edges separated or slightly flared.
When separating the wrappers, I find the harder they are to separate, the better they will be. When you are flying through the process of separating the wrappers, they might be a little on the dry side. They can still be used to wrap up some lumpia but they will be more sensitive to tearing.
Separate one package for each person rolling at a time. After separating the package into a stack of individual wrappers, be sure to keep them covered with a moistened towel or cloth table napkin. The key is to keep them from getting dried out while wrapping up your lumpia.
The Amount
Yes, lumpia is delicious and we would all love a burrito sized one to enjoy. Unfortunately, adding too much filling in the delicate spring roll wrappers doesn’t always work to our favor. If the wrap does not give when wrapping, it may burst when frying.
You also don’t want to put too much filling in a wrap because, once again, it can absorb too much oil. Not to mention, the Filipino in us is going to want to make as many as possible. I found that 2 tablespoons of filling works well. You can measure out 2 tablespoons for each roll, or you can “eyeball” it. Measuring each time will take longer but you can stretch out your filling a little further. For some, rolling lumpia can be on the therapeutic side, but for some it can be frustrating and time consuming. Do what you need to do, to make wrapping lumpia a positive experience.
A Wrapping Visual
I will go on the record by saying that this is just a suggestion. I know that there are many methods, techniques or tricks to wrapping but I want to help out those who are giving it a shot for the first time. By all means, if there is a family, traditional style of wrapping that you know of, “take it to the moon”!
The key is to practice making your rolls as tight as possible, without tearing the fragile wrappers. Here is a printable or downloadable instruction sheet as reference. You can use it as base knowledge and make any adjustments to suit your talents.

Set those aside (maybe all) that you will cook immediately. Lumpia is also great to store in the freezer, to later accompany other great Filipino dishes, like Munggo with Pork and Shrimp. I like freezing them in gallon size Ziploc bags. To make future meals easier, I bag them in equal shares, maybe twelve a bag. You can separate rows in a bag with parchment/wax paper.
Cooking Tips
Cooking is the easy part, but it can be dangerous if you are not accustomed to deep frying. I have heard of ideas of putting them in the oven or air fryer, but I have yet to try it. As healthy as we would want them to be, biting into something deep fried is part of the yumminess. When they are nice and golden, carefully shake off as much oil as possible and then let them cool off on a plate or cooling rack. Place them on a paper towel, as they cool off, to get even more oil soaked up.
Before you get to that point, you have to brave the hot oil. You can get a more of an even cooking if your oil is deep enough to completely submerge them. Be sure that your oil temperature is at least 350℉ before cooking. If it is too low, your lumpia will soak up too much oil. Keep in mind, that when you are frying them frozen, your oil temperature will decrease. Put in as many lumpia in the pan that you can handle. You don’t want to risk others from getting burned as you shake off the oil of another.
Don’t walk away while deep frying. Even when frozen, lumpia will take about five minutes to cook to a golden brown tone. Lumpia not frozen will be even faster. Flip with cooking tongs, if necessary.
There are many off the shelf sauces that you can purchase to go with your Delicious Lumpiang Korpino. By far, my favorite is a combination of vinegar, soy sauce, garlic and pepper.
Yes, it will be a labor of love but you will enjoy this Delicious Lumpiang Korpino Recipe!
Kain na tayo!
“So, whether you eat or drink, or whatever you do, do all to the glory of God.”
1 Corinthians 10:31
Delicious Lumpiang Korpino Recipe
Equipment
- Deep Fryer or Deep Frying Pan
- Cooking Tongs
- Large Mixing Bowl
- Colander
Ingredients
Lumpia Wraps
- 3 Packages Spring Roll Wrappers Menlo Wraps 30 Count Package
- 1 Egg Scrambled for sealing the roll.
Bulgogi
- 3½ lbs Beef Eye Round Sliced 3½-3¾ lbs
- ¾ Cup Brown Sugar Packed
- 5 Cloves Garlic Smashed or minced
- 5 Stalks Green Onion Chopped
- 5 Slices Ginger Thumb size
- 1 Tsp Gochugaru I use fine powder, coarse will do too
- 4 Tbsp Sesame Oil
- 1 Cup Soy Sauce
- ¾ Cup Water Room Temp
Vegetable Filling
- 1 Cabbage Shredded
- 1 lg Carrot Match Sticks
- 2 cans Water Chestnuts Match Sticks
- 2 cans Garbanzo Bean Peeled
- 1 lb Frozen French Cut Green Beans Defrosted
- 1 med Onion Chopped
- 1 Potato A Little Thicker than Match Sticks
- Salt and pepper to taste Optional
Instructions
Filling - Bulgogi (Meat) and Vegetables
- In a big enough mixing bowl or sealable container, mix brown sugar, gochugaru, garlic, sesame oil, water and soy sauce until sugar is dissolved. Add chopped green onion and ginger slices.
- To ensure that all slices get access to the flavors, separate and dunk each slice into the marinade. Allow it to sit in the refrigerator for at least 30 minutes, which is more than enough time. Although, there is an adequate amount of water in the marinade, to let it sit over night.
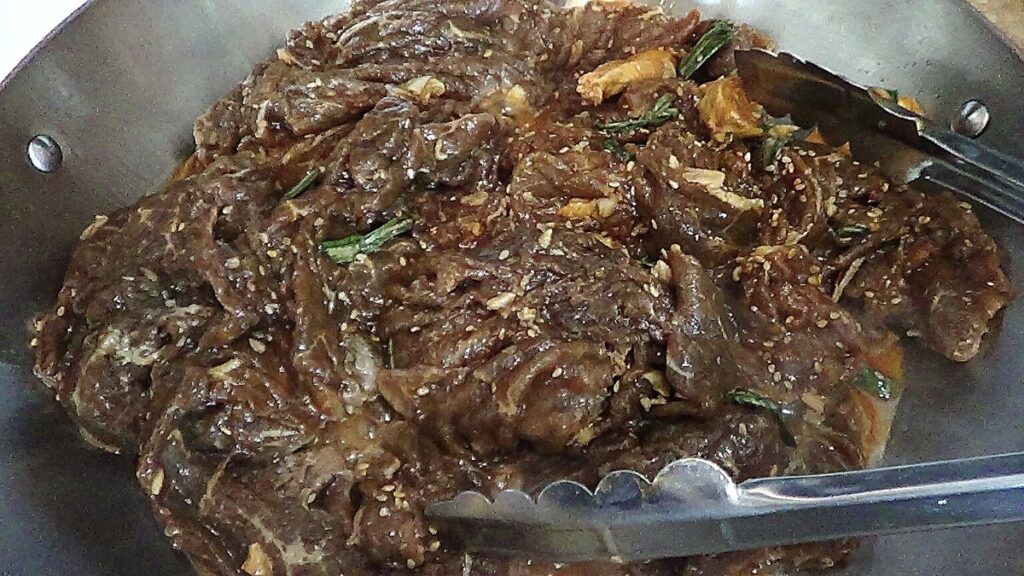
- Preheat a big enough frying pan at a medium low heat. Thinly sliced round eye will cook fast but a slow, simmer cooking will tenderize it well enough. Flip periodically to prevent burning. Cook for 30 minutes. Cool in a colander to drain access marinade. Set aside and refrigerate when cool.
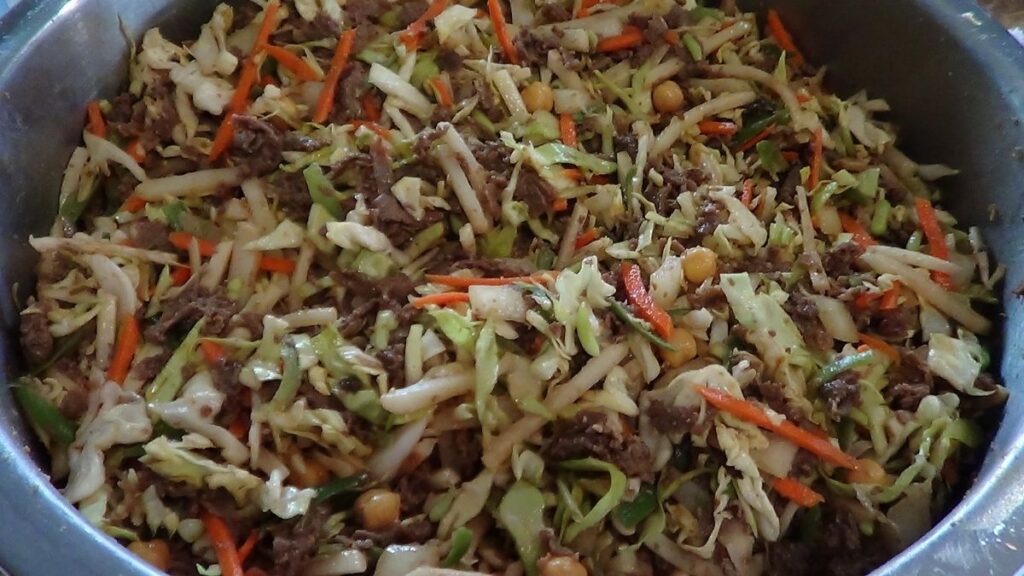
- In a large bowl, combine all prepared (peeled, shredded, cut, veggies, defrosted, etc.)
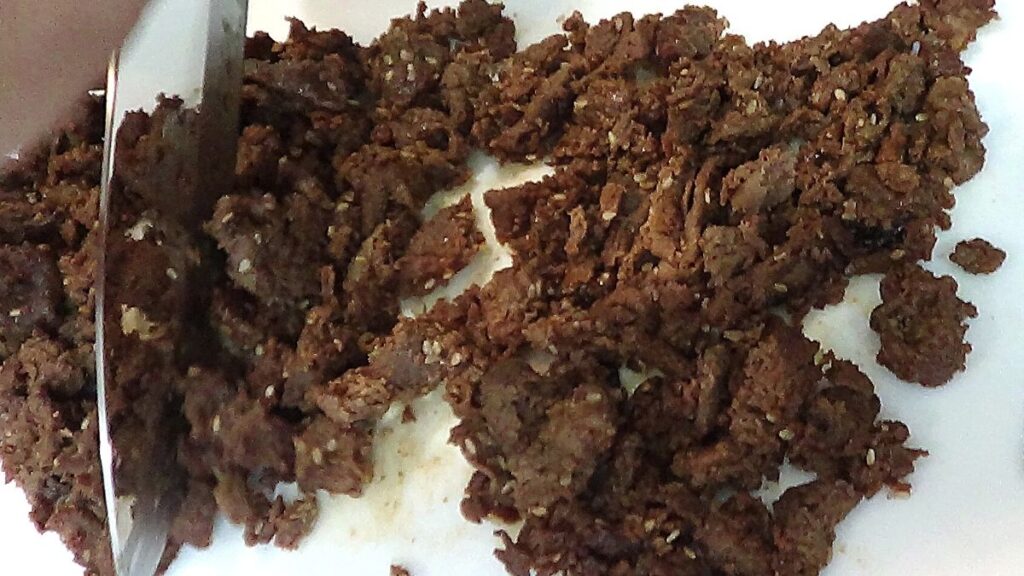
- Remove ginger slices from meat and chop up the meat well. Add meat to veggies and mix all ingredients well. Refrigerate to soften up veggies.
Wrapping Lumpia
- Defrost then separate individual spring roll wrappers from the package. Place them on a plate and cover them with a wrung out, cloth table napkin or towel.
- Scoop out enough filling for incremental work, and leave the bulk of the filling refrigerated. Place the filling in a small colander if draining is necessary.
- Using 2 table spoons per lumpia is sufficient. Follow diagram provided to roll your lumpia.
Cooking Instructions
- Fill deep fryer or deep fryer pan with vegetable or canola oil. Enough oil to fully submerge the lumpia is best for even cooking. Preheat oil to 350°F
- Carefully place lumpia in oil. With cooking tongs, turn if necessary. Remove when golden brown. When deep frying, it does not take long for lumpia to cook, even when frozen. 3-5 minutes fresh and a little more when frozen, so do not leave or take your eyes off of the stove for too long.
- Carefully shake off access oil when done and let finished rolls cool off on paper towel to absorb more access oil. Cool before eating.
Notes
Don’t Forget Your Lumpia Wear!
Click the image below to see colors and sizes